
RV Interior Vent Covers
March 10, 2025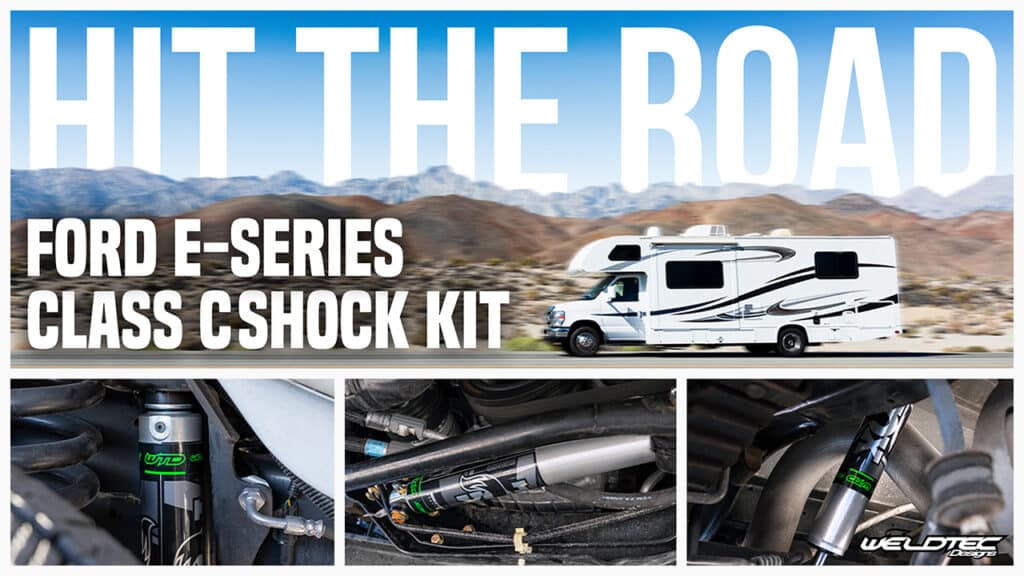

When it comes to ensuring that your Class C RV drives smoothly and comfortably, the suspension system plays a vital role. At WeldTec Designs we understand this, which is why we’ve developed the Hit the Road (HTR) Shock Kit for Ford E-Series RVs, including the E-350 and E-450 models. This product is designed to improve ride quality and handling by incorporating Fox shocks, a high-performance solution trusted by off-road enthusiasts and professional off-road racing drivers.
In this post, we’ll break down the installation process for the WeldTec Designs HTR Shock Kit, featuring Fox shocks, a steering stabilizer, and all the necessary components to upgrade your RV’s suspension. Whether you’re a DIY enthusiast or just looking to understand the benefits of this kit, this guide will help you get your Ford E-Series Class C RV ready for the open road.
What Is the WeldTec Designs HTR Shock Kit?
The HTR Shock Kit by WeldTec Designs is designed specifically for Ford E-Series Class C RV’s, including both E-350 and E-450 models. The kit includes high-quality Fox shocks for both the front and rear of your RV, along with a steering stabilizer to enhance handling and reduce steering fatigue. Whether you’re tackling long road trips or just want a smoother drive on a daily basis, the HTR kit promises to improve your RV’s driving performance.
The main goal of the HTR kit is to make your Class C RV drive better and feel more controlled. With added Fox shocks, your RV will have improved suspension performance, better damping, and enhanced comfort while driving. The steering stabilizer ensures that your vehicle’s steering remains steady, especially during crosswinds and other challenging driving conditions.
Why Choose Fox Shocks for Your RV?
Fox shocks are renowned for their performance in off-road and heavy-duty applications. As a leading manufacturer of high-performance suspension components, Fox has built a reputation for providing smooth, controlled rides, even in challenging conditions. For RV owners, this means:
- Improved ride comfort: The shocks absorb road imperfections, leading to a smoother ride for both the driver and passengers.
- Enhanced handling: With the shocks’ superior damping, your RV will feel more stable, especially when navigating sharp turns or gusty winds.
- Durability: Fox shocks are built to last. Whether you’re going over rough terrain or cruising on highways, these shocks can handle the job without degradation in performance.
- Longevity: You’ll never need to buy another shock, Fox shocks are not only crafted with quality materials, but are also rebuildable and able to be re-valved , ensuring you get a long life out of your shocks, as well as tune the ride quality to your liking.

Tools and Materials You’ll Need for the Installation
Before you start the installation, make sure you have the following tools and materials on hand:
- WeldTec Designs HTR Shock Kit (including Fox shocks and steering stabilizer)
- 22mm wrench (for lug nut removal)
- Sawzall (optional for cutting shock studs)
- Drill with 3/8-inch drill bit (for steering stabilizer installation)
- Various sockets and wrenches (9/16-inch, 3/4-inch, 15mm, 13/16-inch)
- Jack and jack stands (or leveling jacks if your RV is equipped with them)
- Vice grips (optional for easier shock installation)
- Safety glasses (for protection while drilling)
Step-by-Step Installation of the Fox Shocks and Steering Stabilizer
1. Lifting the RV
Before starting the installation, you’ll need to lift your RV to give you enough clearance to work on the suspension. If your RV is equipped with leveling jacks, use them to lift the vehicle slightly. If not, use a jack to raise the RV and place jack stands under the frame to ensure stability while working.
2. Removing the Old Shocks
With the RV lifted, remove the wheels using a 22mm wrench to take off the lug nuts. This gives you access to the shocks. To remove the old shocks, you have two options:
- Use a ratchet wrench and secondary wrench to undo the shock bolts (a time-consuming process)
- Use a Sawzall to cut the shock stud off, which is much quicker
The Sawzall method is highly recommended for those who want to avoid spending too much time on this step.
3. Preparing the Steering Stabilizer
Next, it’s time to install the Fox steering stabilizer. The HTR kit includes all the necessary hardware, including the frame mounting bracket and tie rod mounting bracket.
- Frame Mount Bracket: This part will attach to the frame of the RV and requires drilling four holes to secure it in place.
- Tie Rod Tab: This mounts onto the tie rod and connects to the steering system for improved stability.
To install the steering stabilizer:
- Remove the old steering stabilizer by unbolting it from the frame and tie rod.
- Drill holes for the new mounting bracket. Ensure you wear safety glasses while drilling for protection.
- Attach the frame mount bracket to the frame using the provided hardware (3/8-inch bolts and washers).
- Install the tie rod tab using U-bolts and tighten the hardware.
4. Installing the Front Fox Shocks
Now that the steering stabilizer is in place, it’s time to install the Fox shocks on the front of the RV.
- Slide the bushing into the shock and insert the shock’s top mount into the appropriate bracket.
- Tighten the nut until snug. Do not overtighten, as this can cause damage to the shock and suspension over time. The goal is to ensure the shock is securely mounted without overloading the components.
5. Installing the Rear Fox Shocks
The installation of the rear shocks follows a similar process to the front:
- Mount the longer rear shock in place, ensuring the bushing is correctly seated.
- Again, tighten the nut just enough to keep the shock secure but not overtightened.
6. Final Adjustments
Once the shocks are installed, take a moment to double-check everything:
- Ensure all bolts are tightened securely but not overly so.
- Test the steering stabilizer to confirm it’s functioning properly and isn’t restricting the steering.
- Lower the RV back to the ground and take it for a test drive. This will allow you to feel the difference the HTR kit makes in terms of ride quality and handling.
Benefits of the WeldTec Designs HTR Kit
By installing the WeldTec Designs HTR Shock Kit, you’re setting yourself up for a more comfortable and controlled driving experience. Here are some of the top benefits:
- Improved ride comfort: With Fox shocks in both the front and rear, your RV will absorb bumps and dips in the road, making long trips much more enjoyable.
- Better handling: The combination of Fox shocks and the steering stabilizer works together to keep the RV steady, even in challenging driving conditions.
- Durability: Both the Fox shocks and the WeldTec parts are built to last, ensuring that you get a long lifespan out of your suspension upgrade.
Conclusion
The WeldTec Designs HTR Shock Kit is an excellent upgrade for anyone looking to improve the suspension and handling of their Ford E-Series Class C RV. With Fox shocks and a steering stabilizer, your RV will experience better ride quality, more stable steering, and overall improved driving performance.
Whether you’re an experienced DIYer or a first-time installer, the steps outlined in this post will help you navigate the installation process with ease. Remember, while the HTR kit requires some mechanical skill, it’s designed to be a relatively straightforward upgrade that will give you big returns in terms of comfort and performance on the road.
If you’re ready to take your RV adventures to the next level, consider installing the WeldTec Designs HTR Shock Kit and experience the road like never before. Happy travels!


